An NTSB style report on my X1C’s latest failure
I did a very normal maker thing.
I took a piece of equipment that had been working fine for about eighteen months, moved it into a nicer, cleaner, quieter setup, and accidentally made the operating environment worse.
The printer in question is my Bambu Lab X1 Carbon. It had been boringly reliable, which is exactly what I want from a 3D printer. I do not want my printer to have character. I want it to sit there, eat filament, make parts, and complain as little as possible.
Then I moved it into a cabinet.
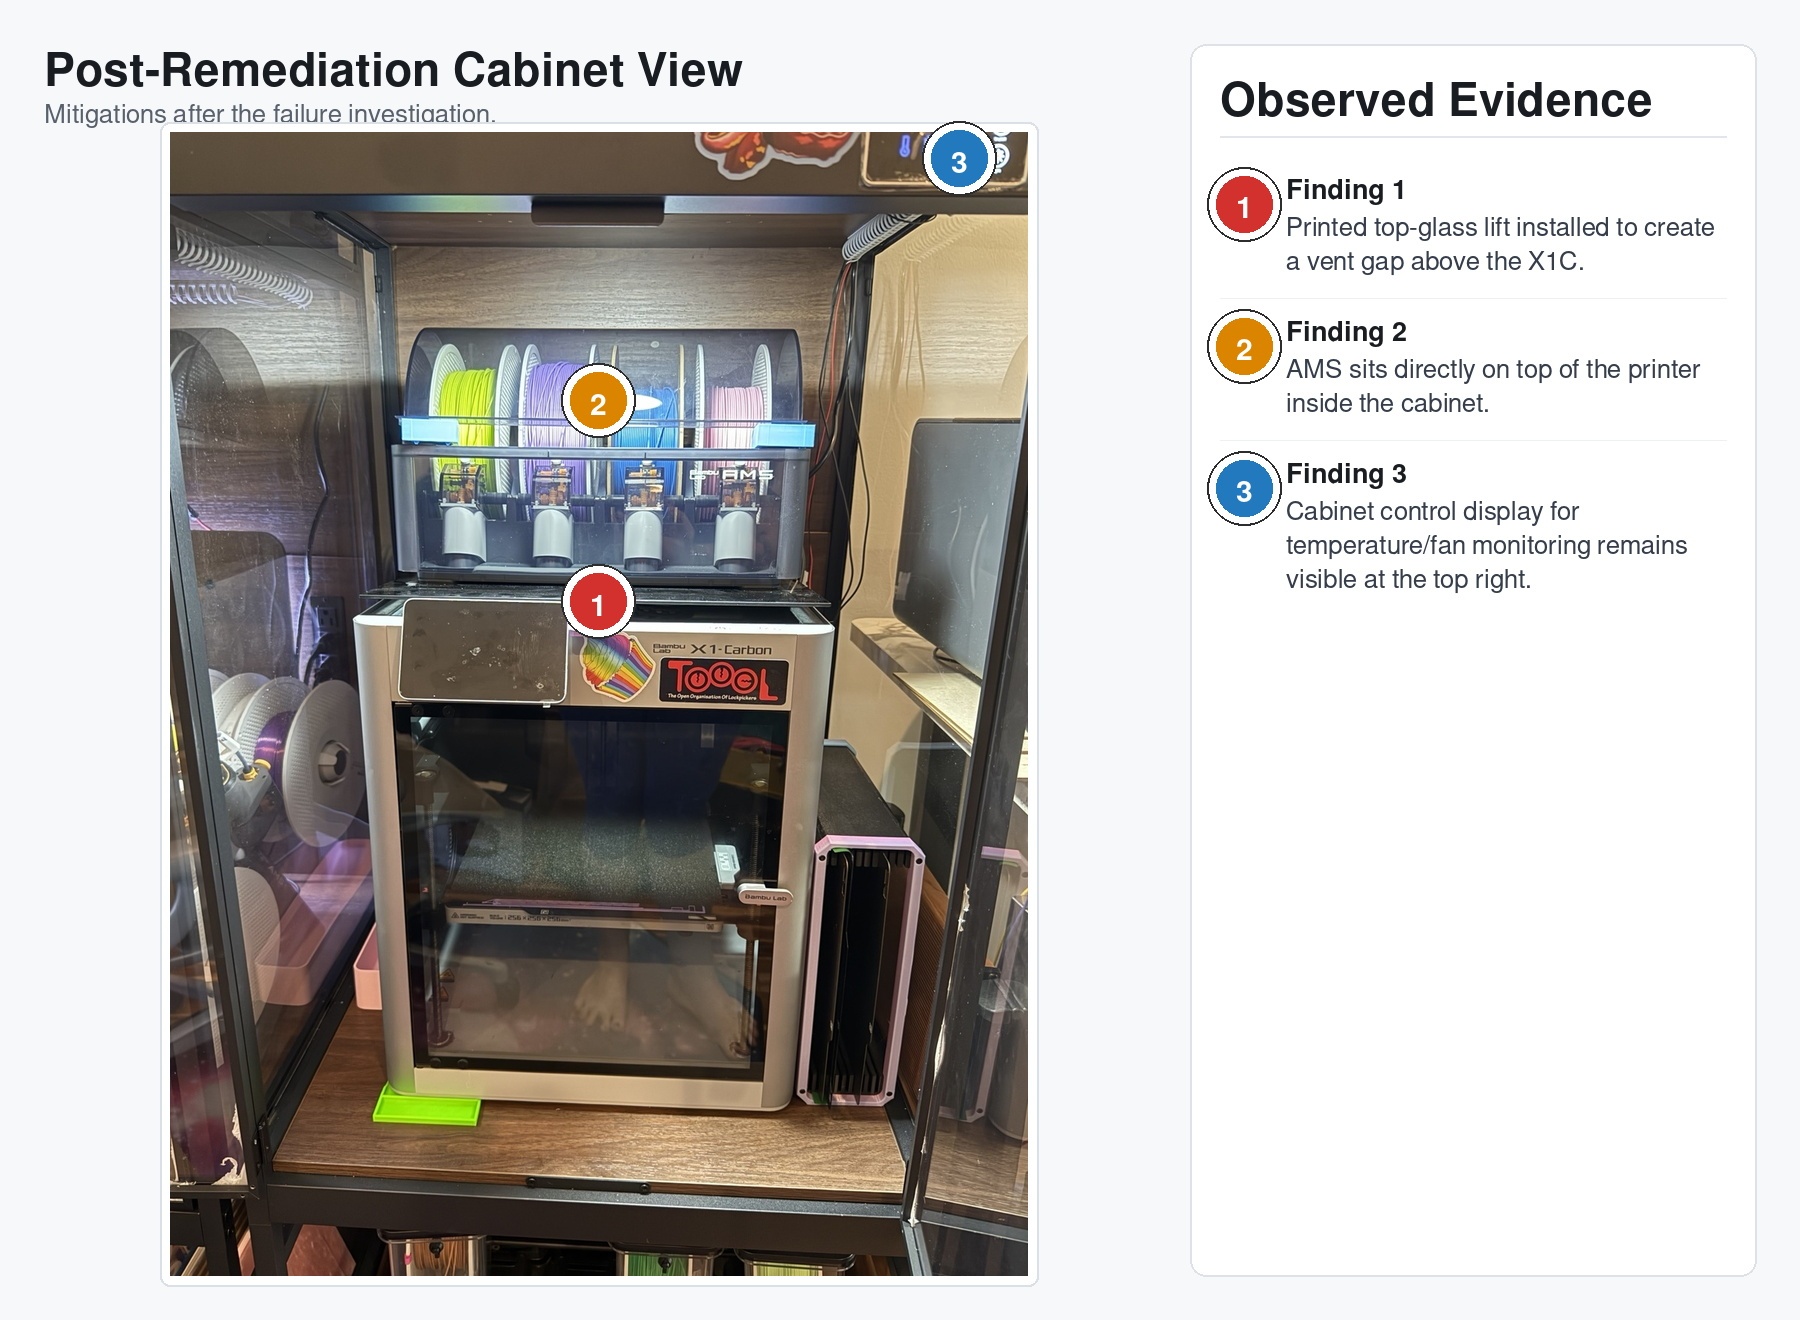
The goals were sensible: less noise, less dust, better filament organization, a neater workshop, and a place to integrate storage and exhaust. The cabinet had acrylic doors, a ducted exhaust path, room for the AMS, and enough room that it all looked intentional.
It was, in fact, intentional.
It was also a small thermal trap.
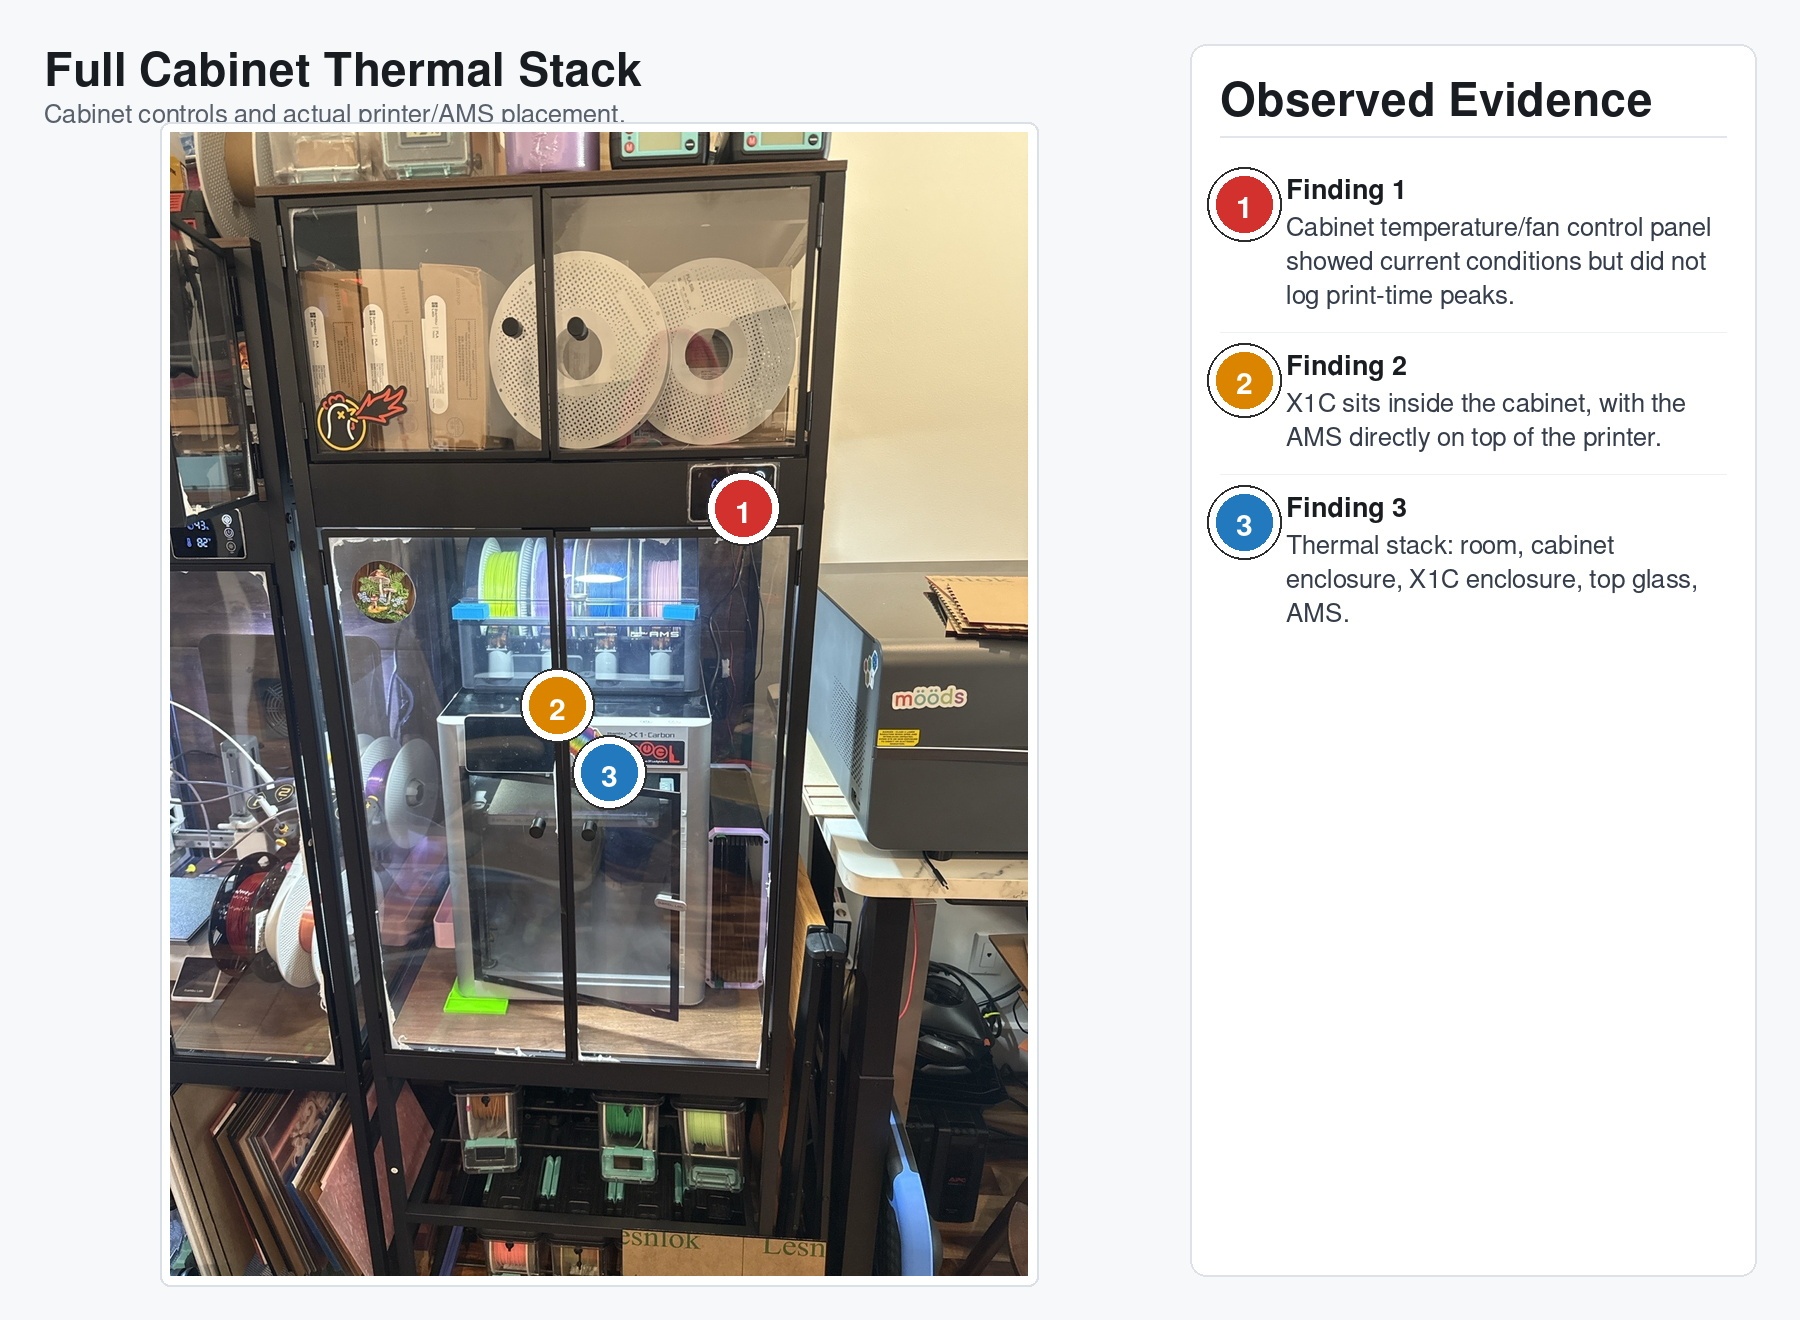
The X1C is already an enclosed printer. Putting it inside a cabinet meant I had built an enclosure around an enclosure. That sounds obvious when I write it down, but at the time I was thinking about dust, noise, storage, and keeping the whole thing contained. I was not thinking enough about average temperature over long print jobs.
I printed PLA with the printer door open. I had exhaust. I had some airflow. I had enough plausible reasons to not worry about it.
Famous last words, etc.
The First Symptom
The first symptom was not dramatic. The printer did not catch fire. It did not throw an error that said, “hey dumbass, you built a convection oven.” It did not do anything that convenient.
The toolhead cover started popping off during prints.
More specifically, it seemed to happen around filament cutter actuation. That made the first theory pretty straightforward: something mechanical was loose, cracked, misaligned, or being struck by the cutter impulse.
That theory was not wrong.
It just was not complete.
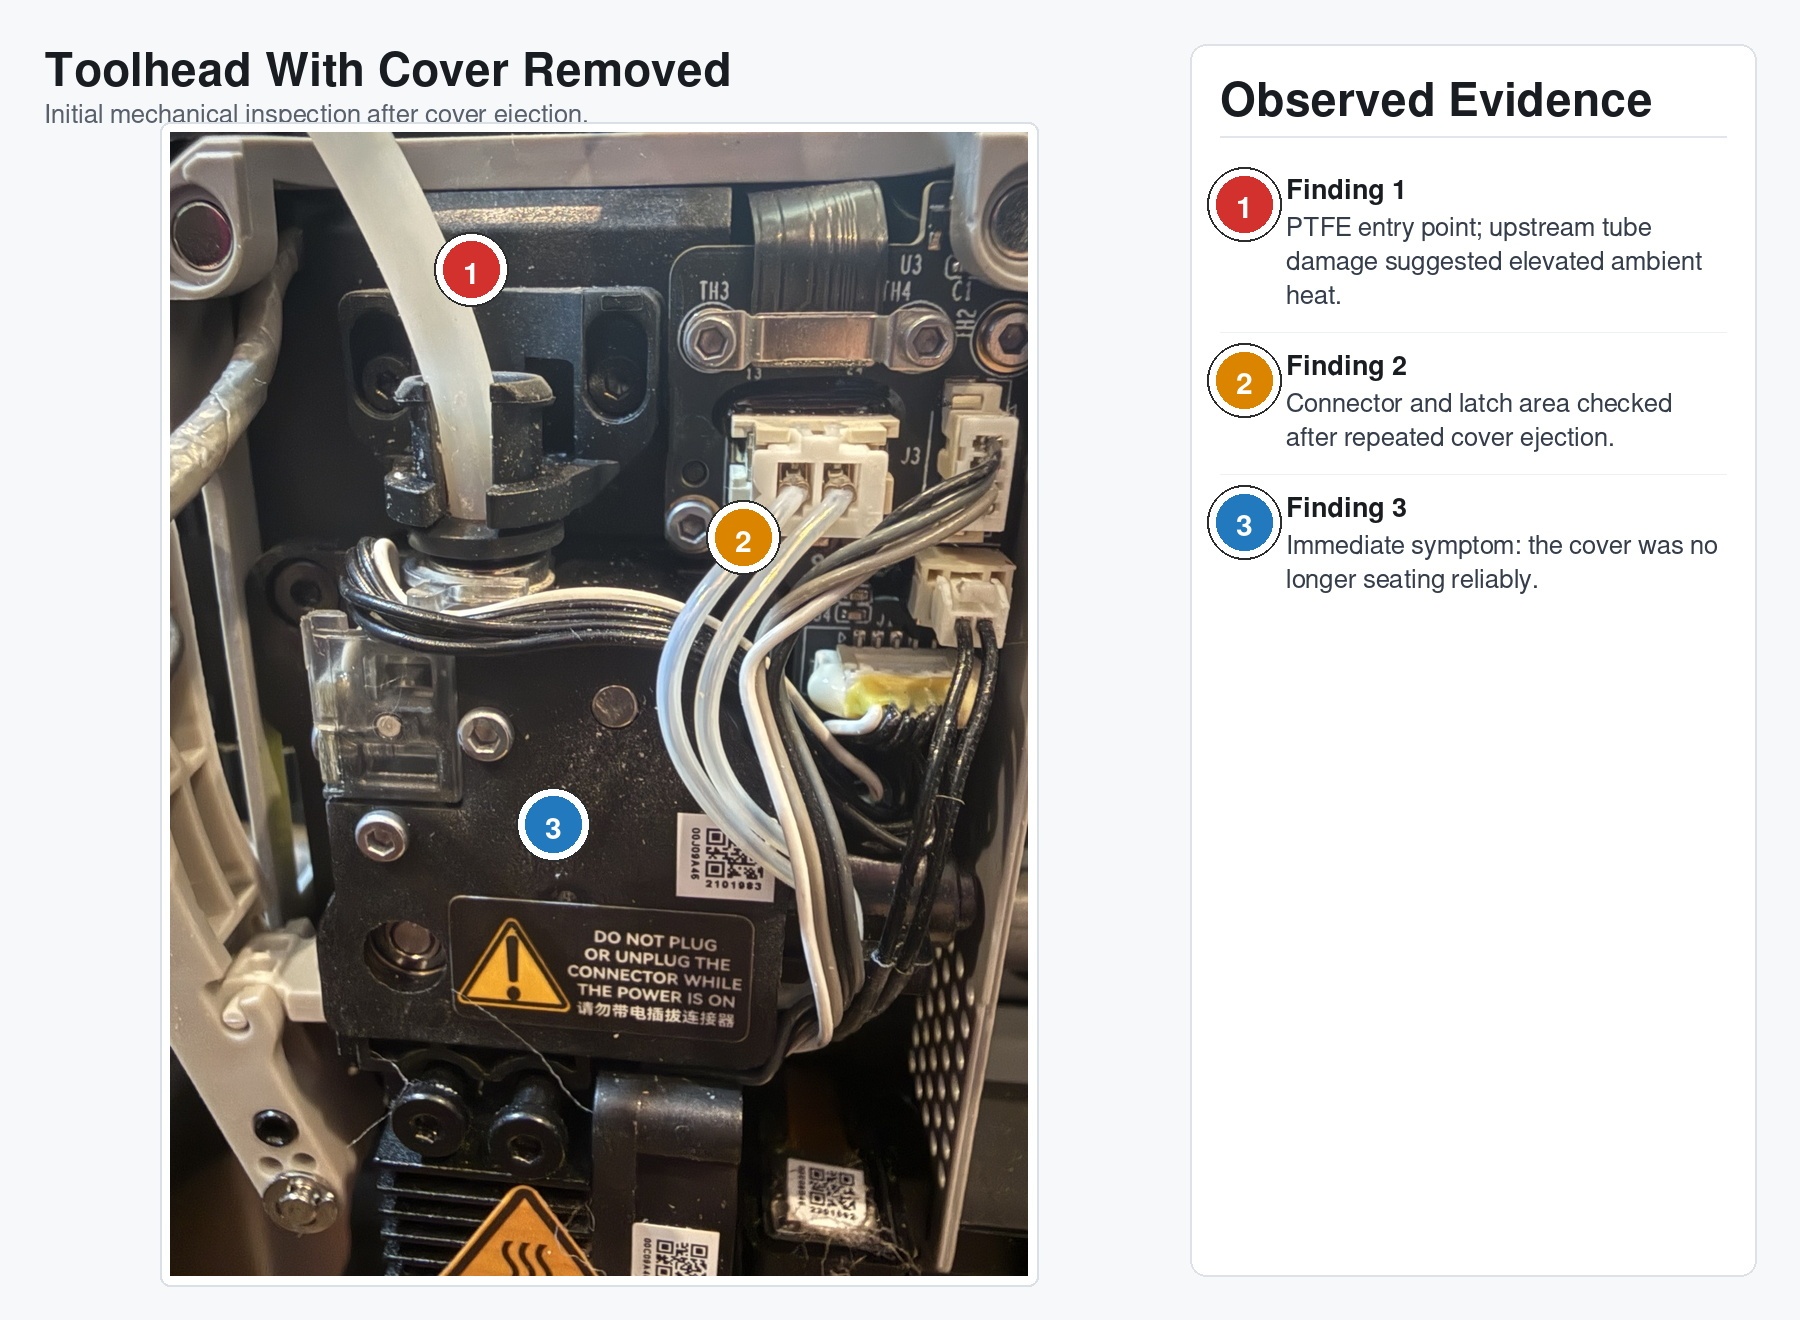
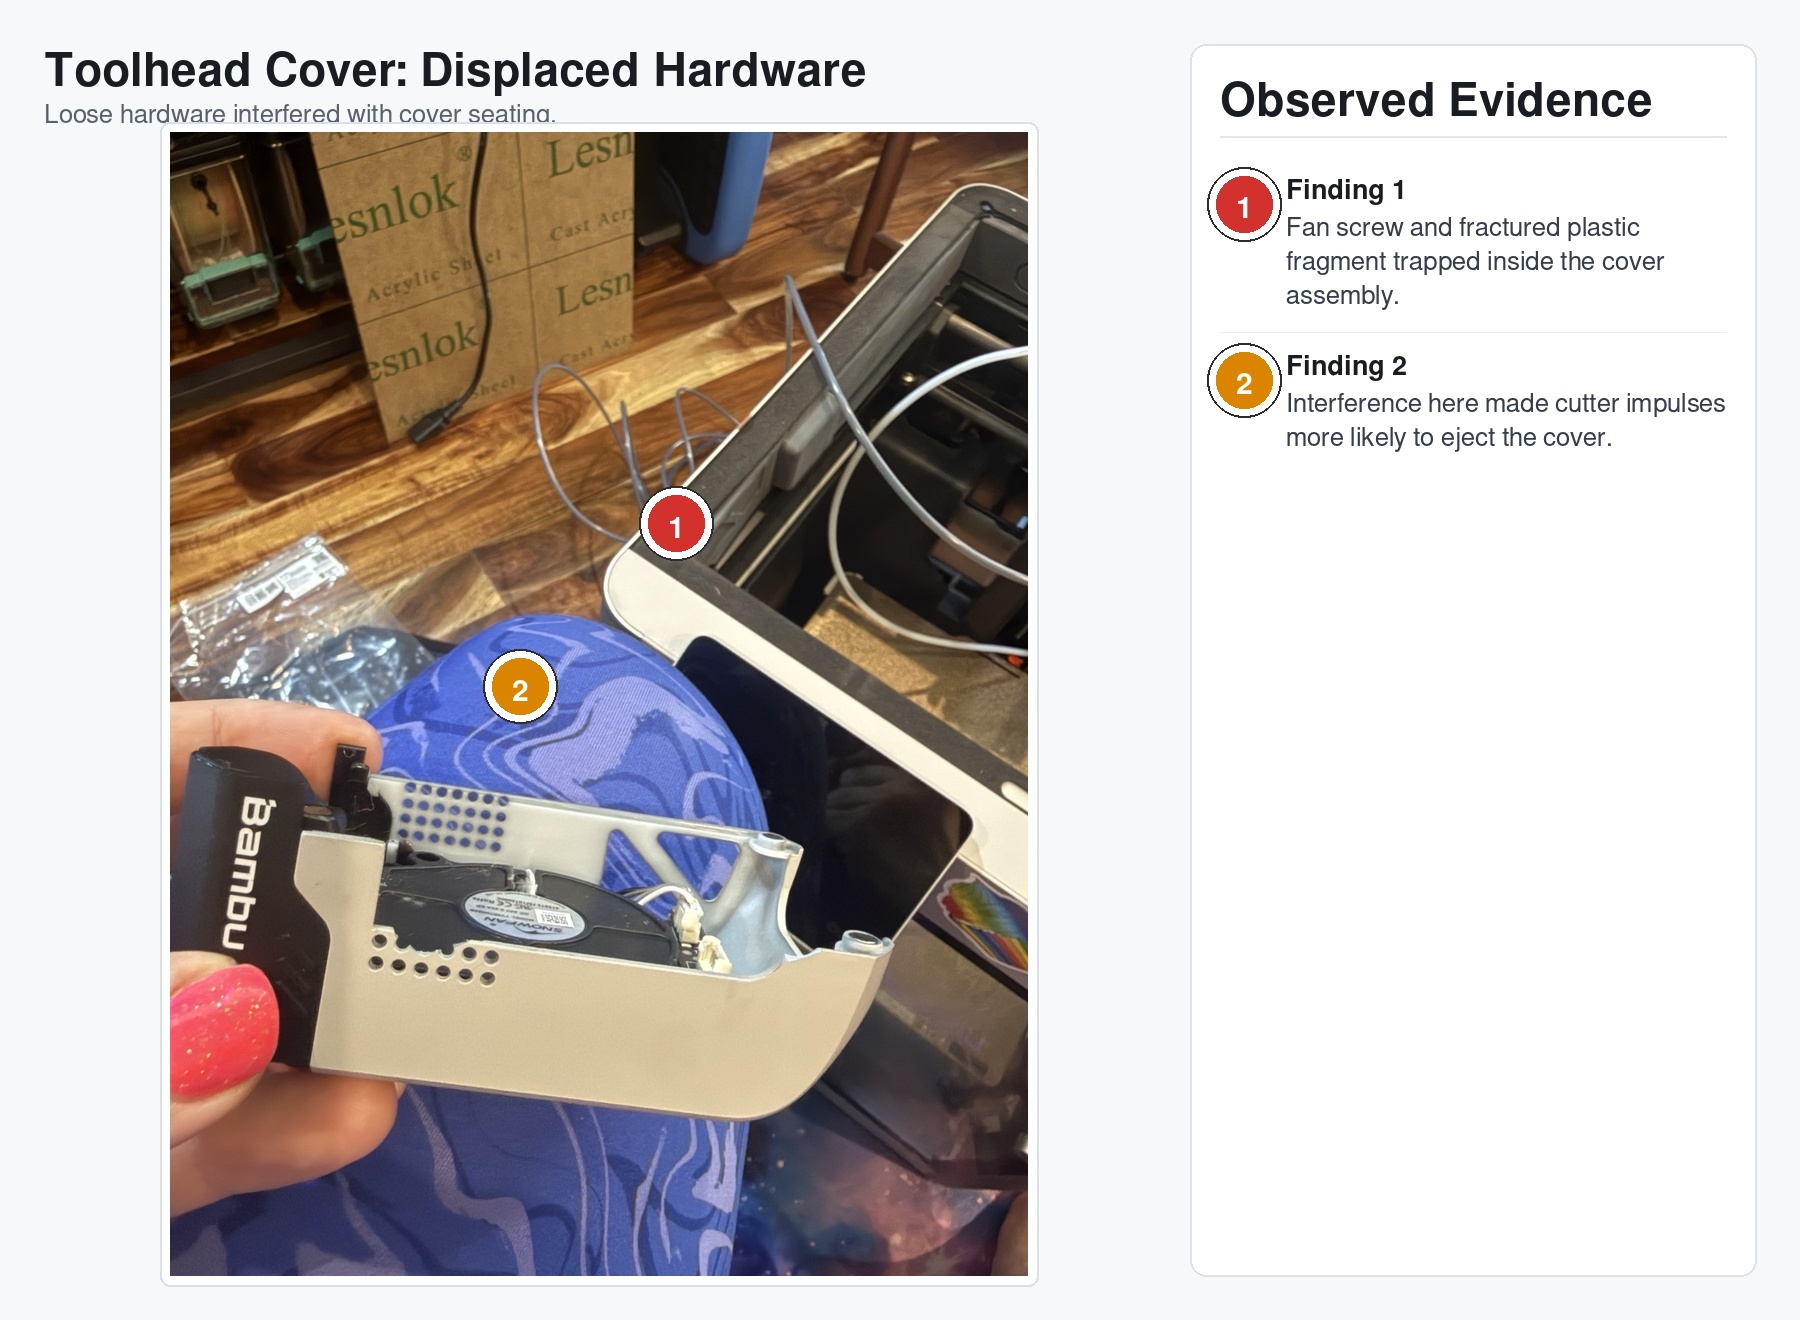
When I pulled the cover and started looking closely, I found the kind of little failures that make you sigh before you fully understand why you are sighing. Retention features were cracked. A fan mounting boss had failed. A screw was still attached to a broken piece of plastic, which is never a sentence you want to write about a moving assembly.
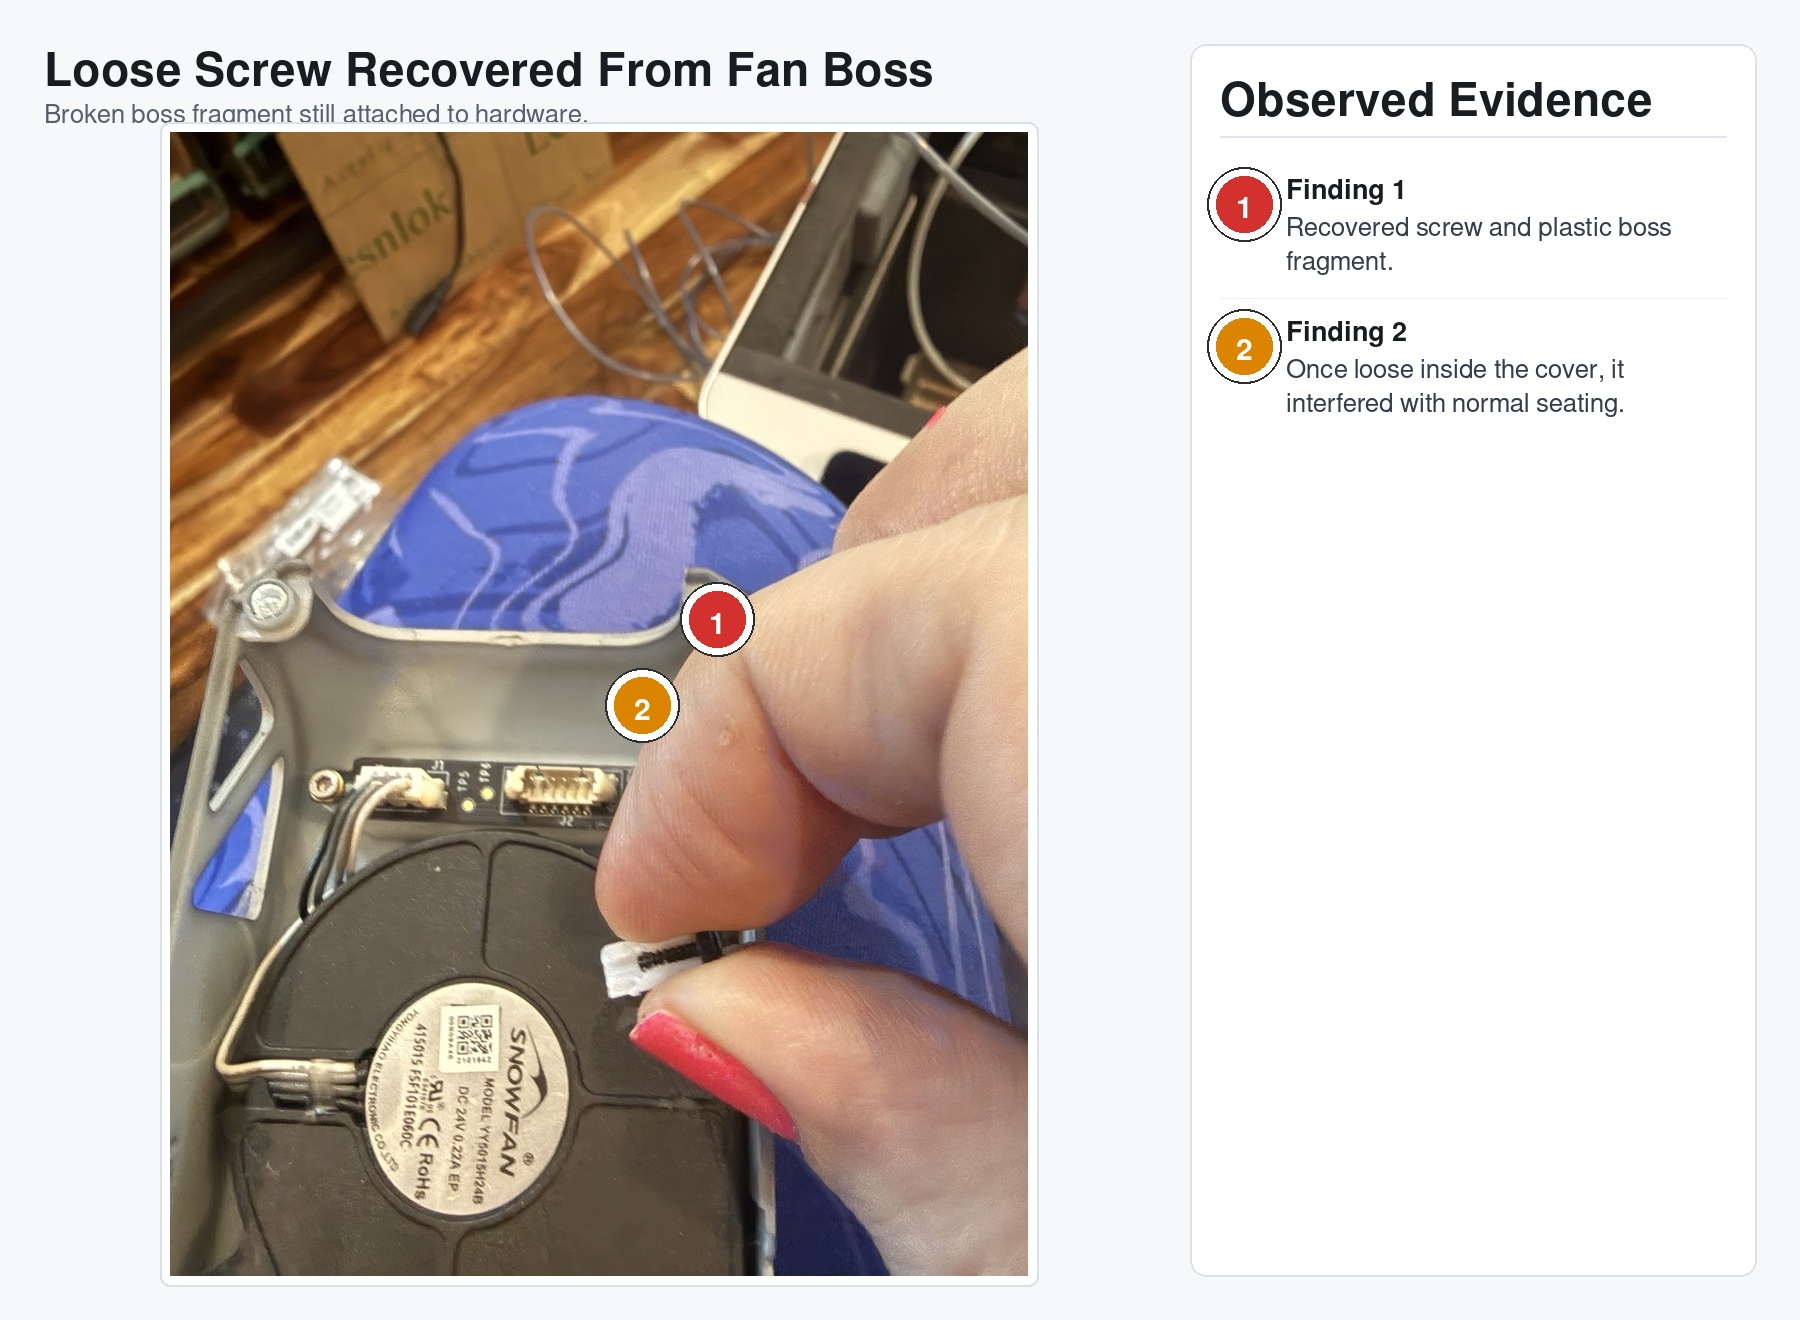
At that point, the cover ejection made sense. If a screw and a chunk of its former home are floating around in the cover assembly, the cover is not going to seat correctly. Add the sharp little impulse from the filament cutter and now the magnetic cover has an excuse to yeet itself off the toolhead.
I would have loved for that to be the whole story.
Replace the cover. Replace the fan mount. Maybe say some rude things about plastic clips. Move on.
But the damage was too spread out.
The Part Where the Evidence Got Annoying
The fan mount damage was not isolated.
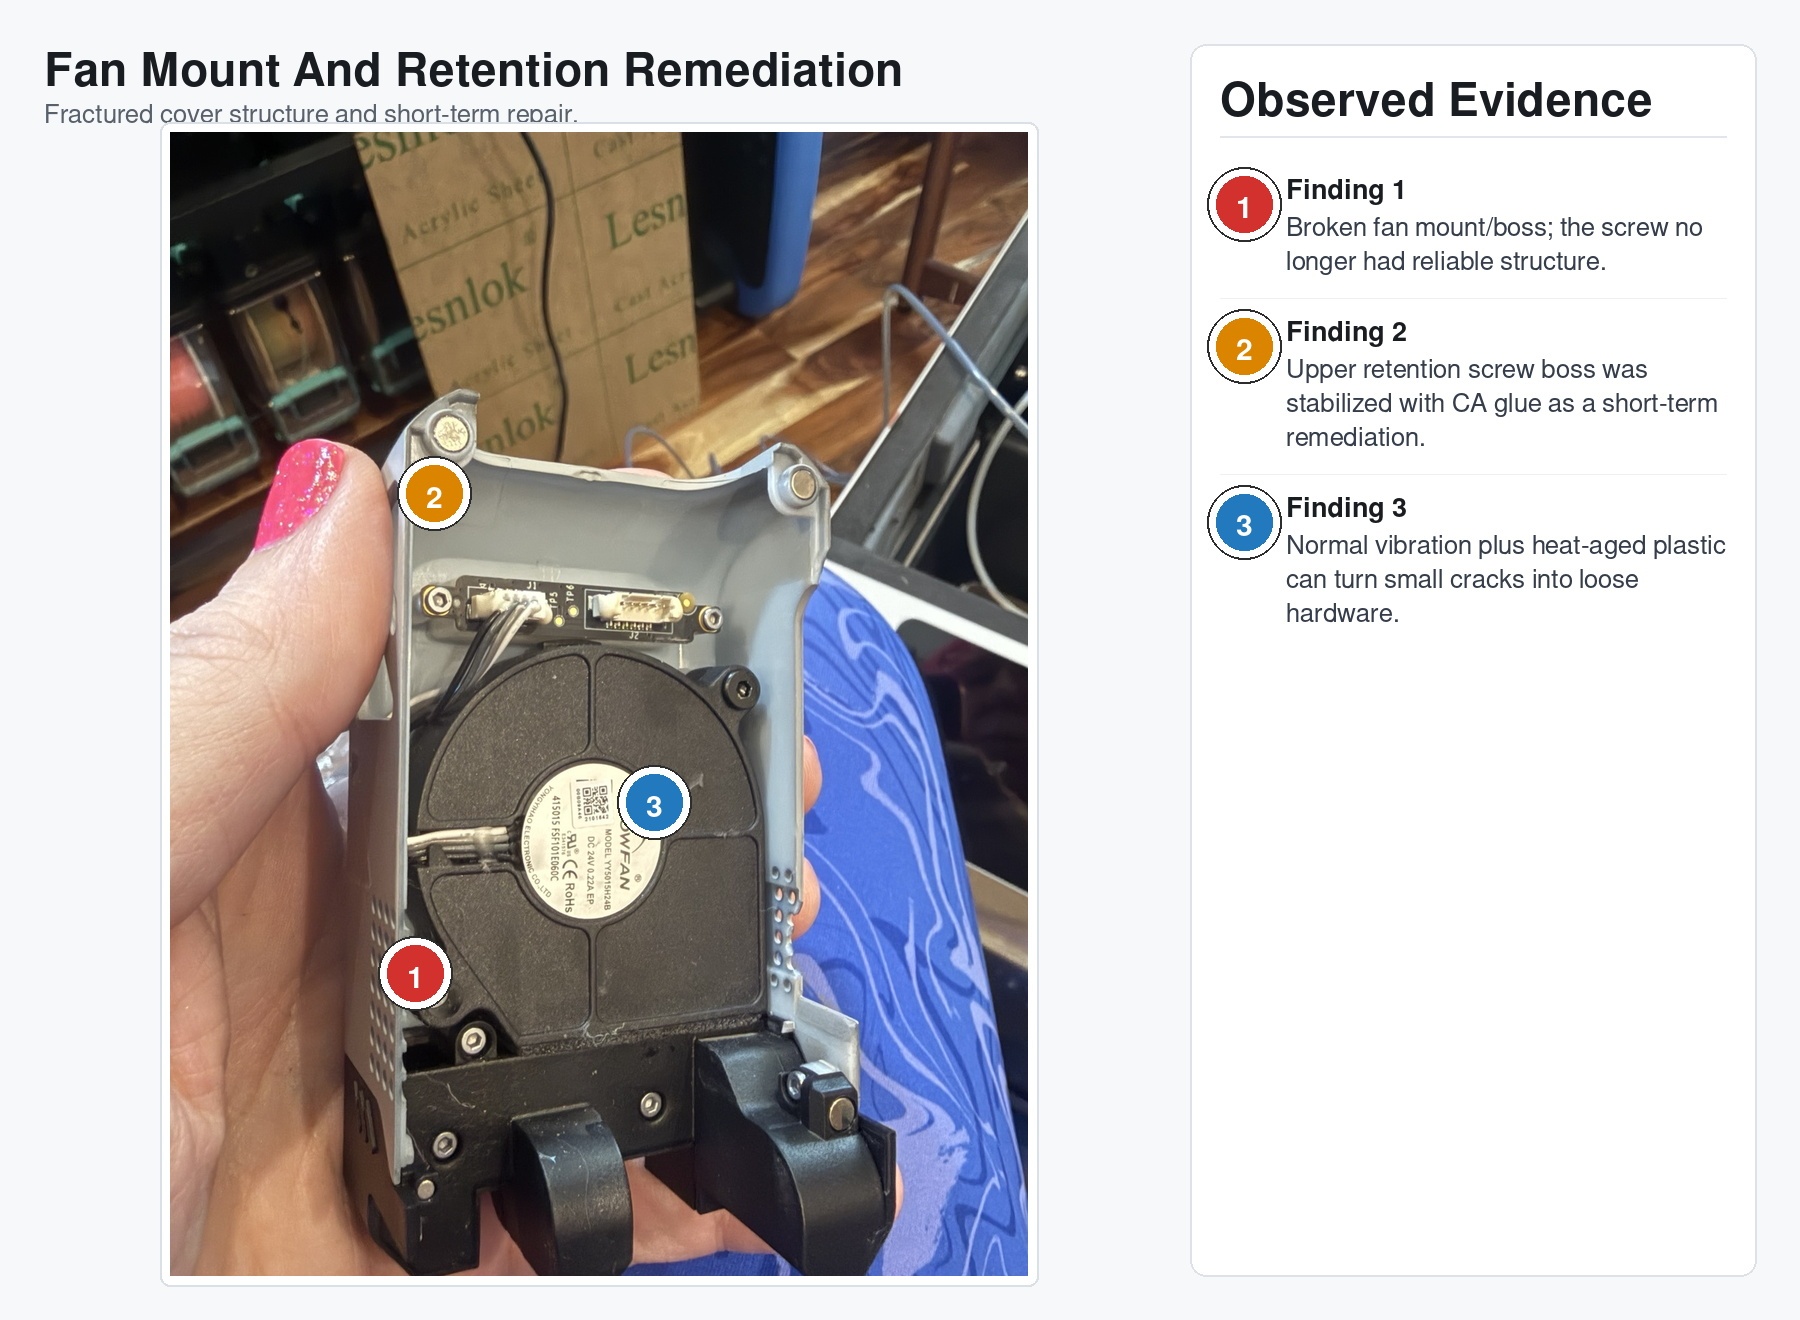
There were multiple fractured or compromised retention points. The plastic did not look like one unlucky tab had been abused. It looked like several parts had aged together and then started giving up together.
That is when the investigation stopped being “what broke?” and became “why did all this break now?”
This is the part of troubleshooting I both love and hate. The machine has already told you the first-order answer. The cover popped off because the cover could no longer stay on. That is true, but it is not useful enough. The useful question is why the cover could no longer stay on after eighteen months of not being a problem.
The next clue was the PTFE tube.
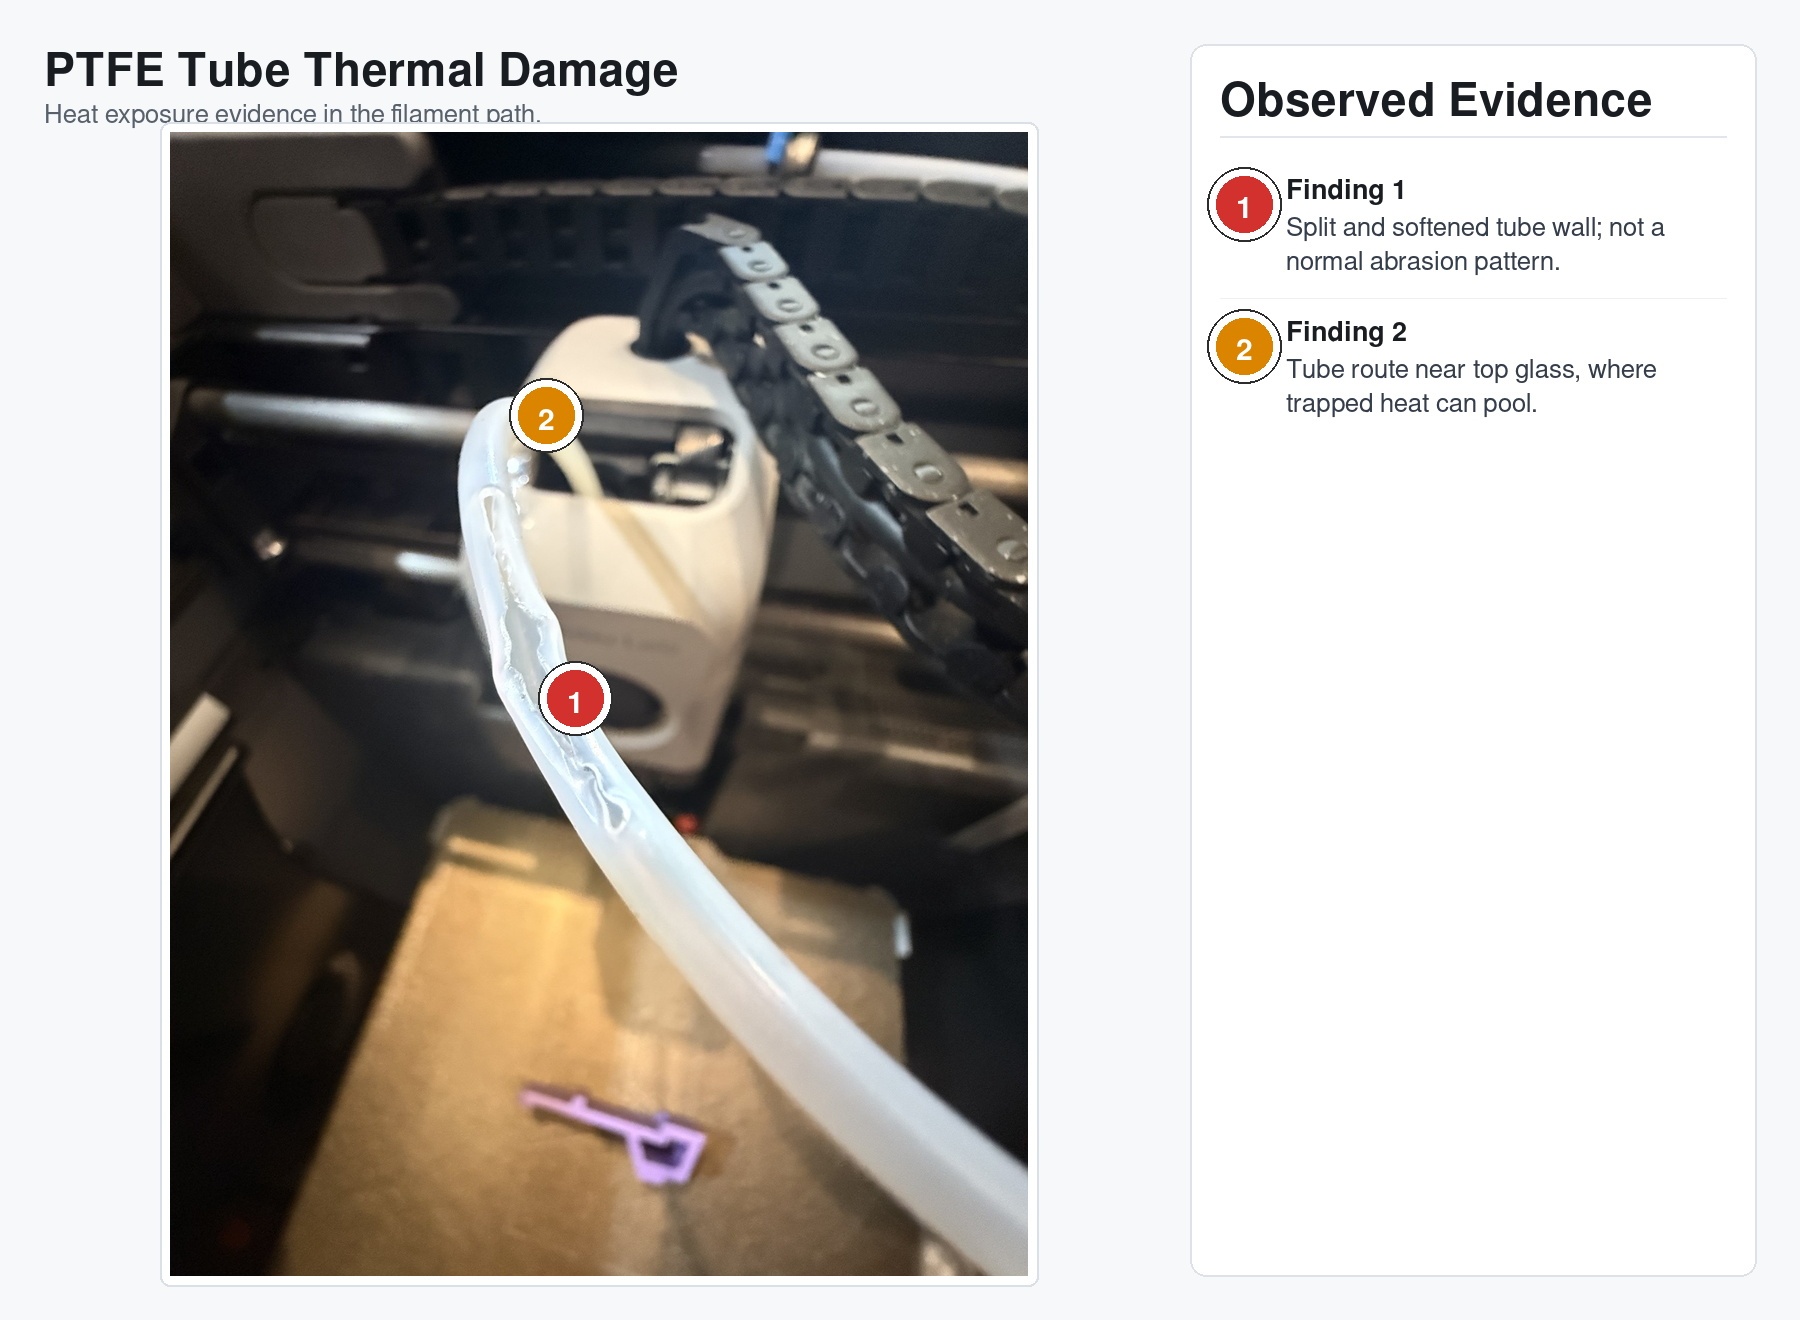
That tube was not merely worn. It was softened, deformed, and split. Normal filament abrasion leaves scratches, flat spots, maybe a worn-through area if you really ignore it. This looked like heat plus time plus mechanical load.
The tube path near the top glass suddenly mattered a lot more.
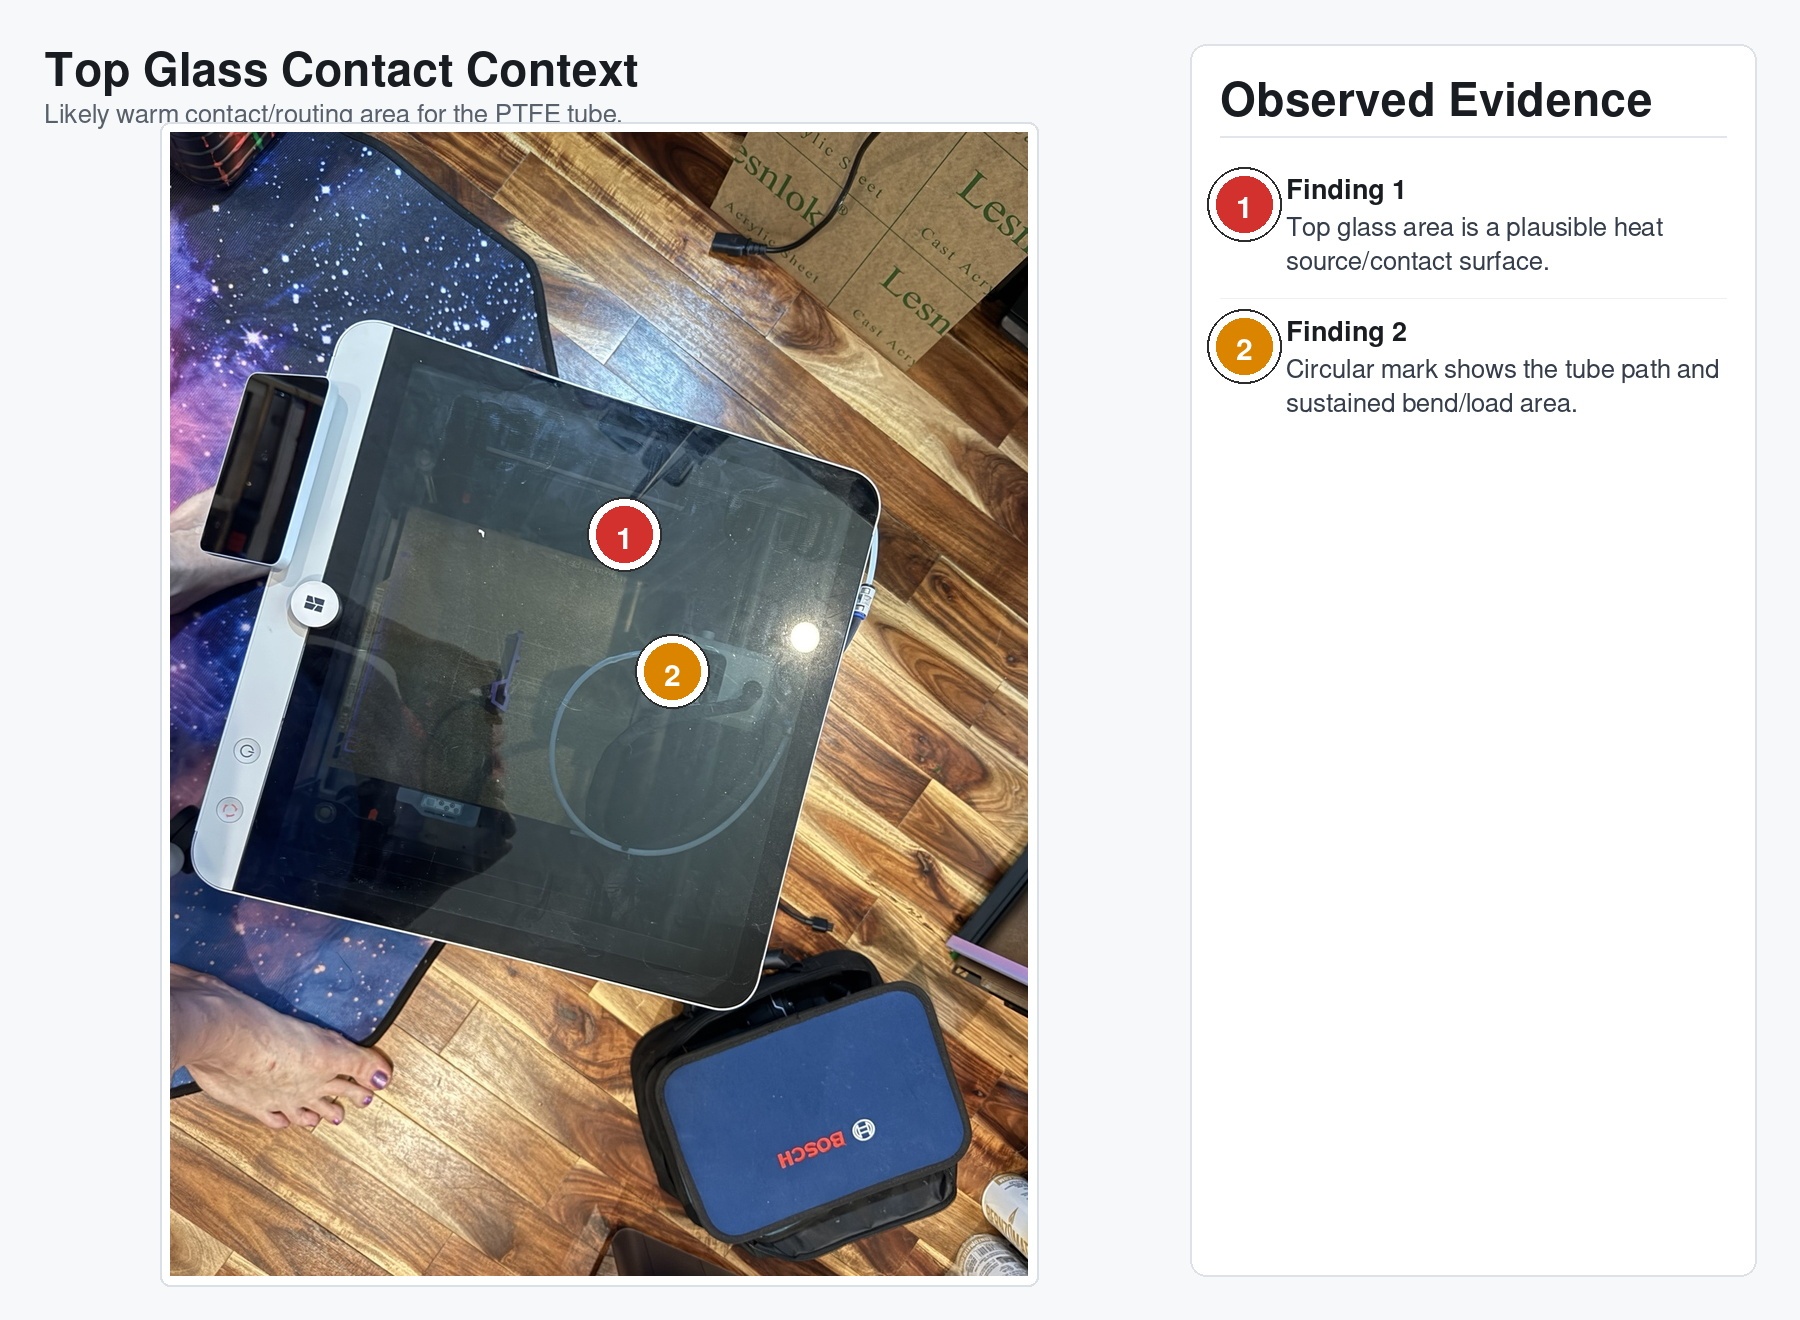
The PTFE had been living near the lid area, bent and routed through a space that was now warmer than it used to be. Not necessarily “everything is melting” warm. More like “this polymer is spending many hours closer to its unhappy place than it was designed to spend” warm.
That distinction matters.
Engineering failures are not always cinematic. Sometimes nothing exceeds a limit loudly enough to throw an alarm. Sometimes you just raise the average temperature, add time, add vibration, add an existing eighteen months of service life, and wait.
The cabinet did not murder the printer in the conservatory with a candlestick.
It slow-cooked it.
The Cabinet Was the Change
The timing lined up too neatly to ignore.
For roughly eighteen months, the printer operated without this pattern of failures. Then I moved it into the cabinet. Several weeks later, I had heat-sensitive components showing accelerated aging: the PTFE guide tube, the toolhead cover retention structure, the fan mounting boss, and connector/latch plastic that should not be under heavy mechanical load.
The cabinet display showed about 85F when I checked it.
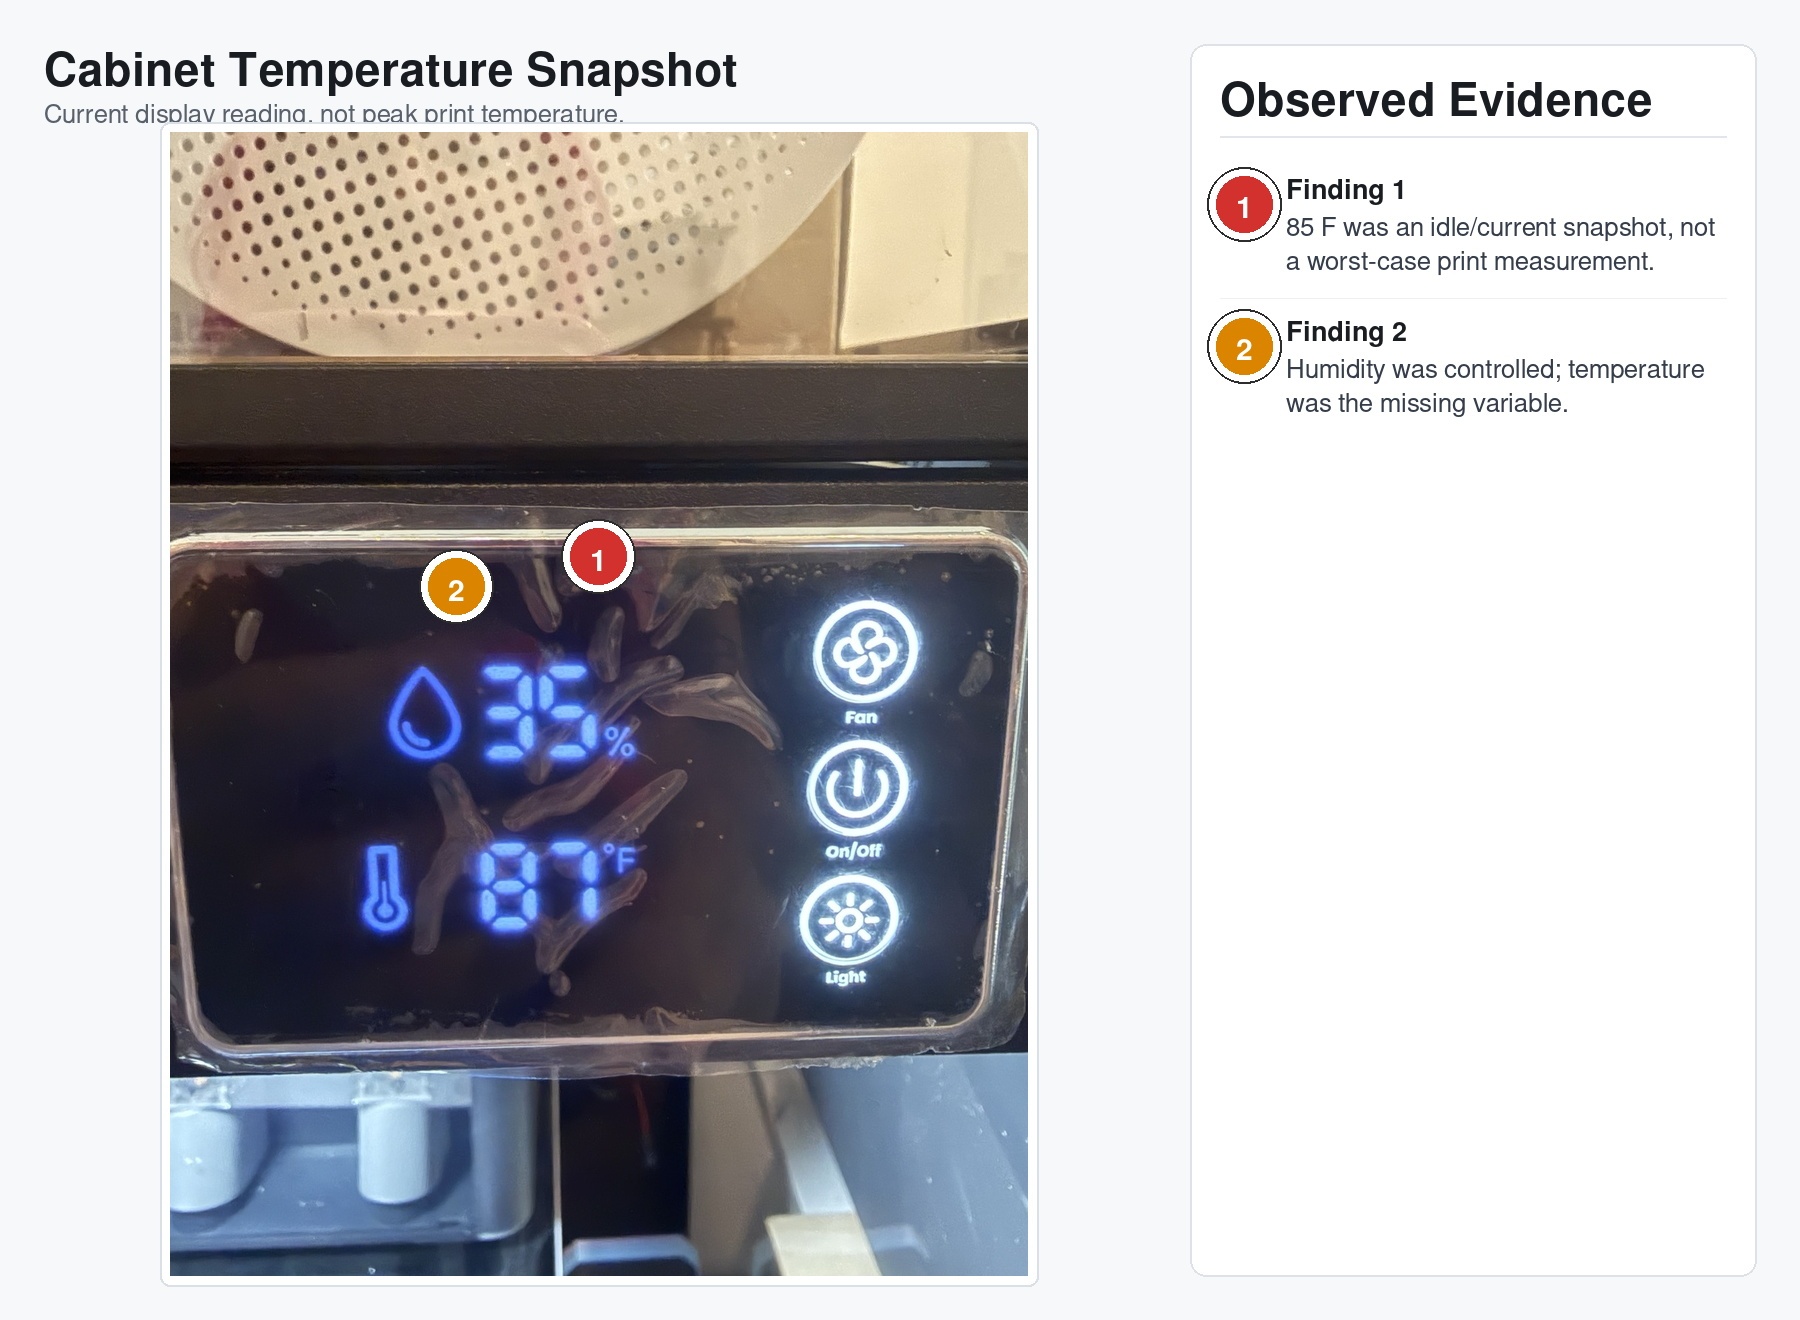
That number is not a smoking gun by itself. It is just a snapshot. It was not necessarily taken during the worst part of a long print. It does not tell me what the air above the printer was doing, what the top glass temperature was, or how much heat was pooling around the AMS and filament path.
But it was enough to make the missing instrumentation obvious.
I had humidity under control. I had storage under control. I had vibes under control.
I did not have temperature logging under control.
This is how most self-inflicted engineering problems happen in my life. I do four reasonable things, skip the fifth because I have momentum, and then the fifth thing turns out to be the load-bearing thing.
The Connector Area Made It Harder to Deny
One of the more convincing pieces of evidence was the connector/latch area.
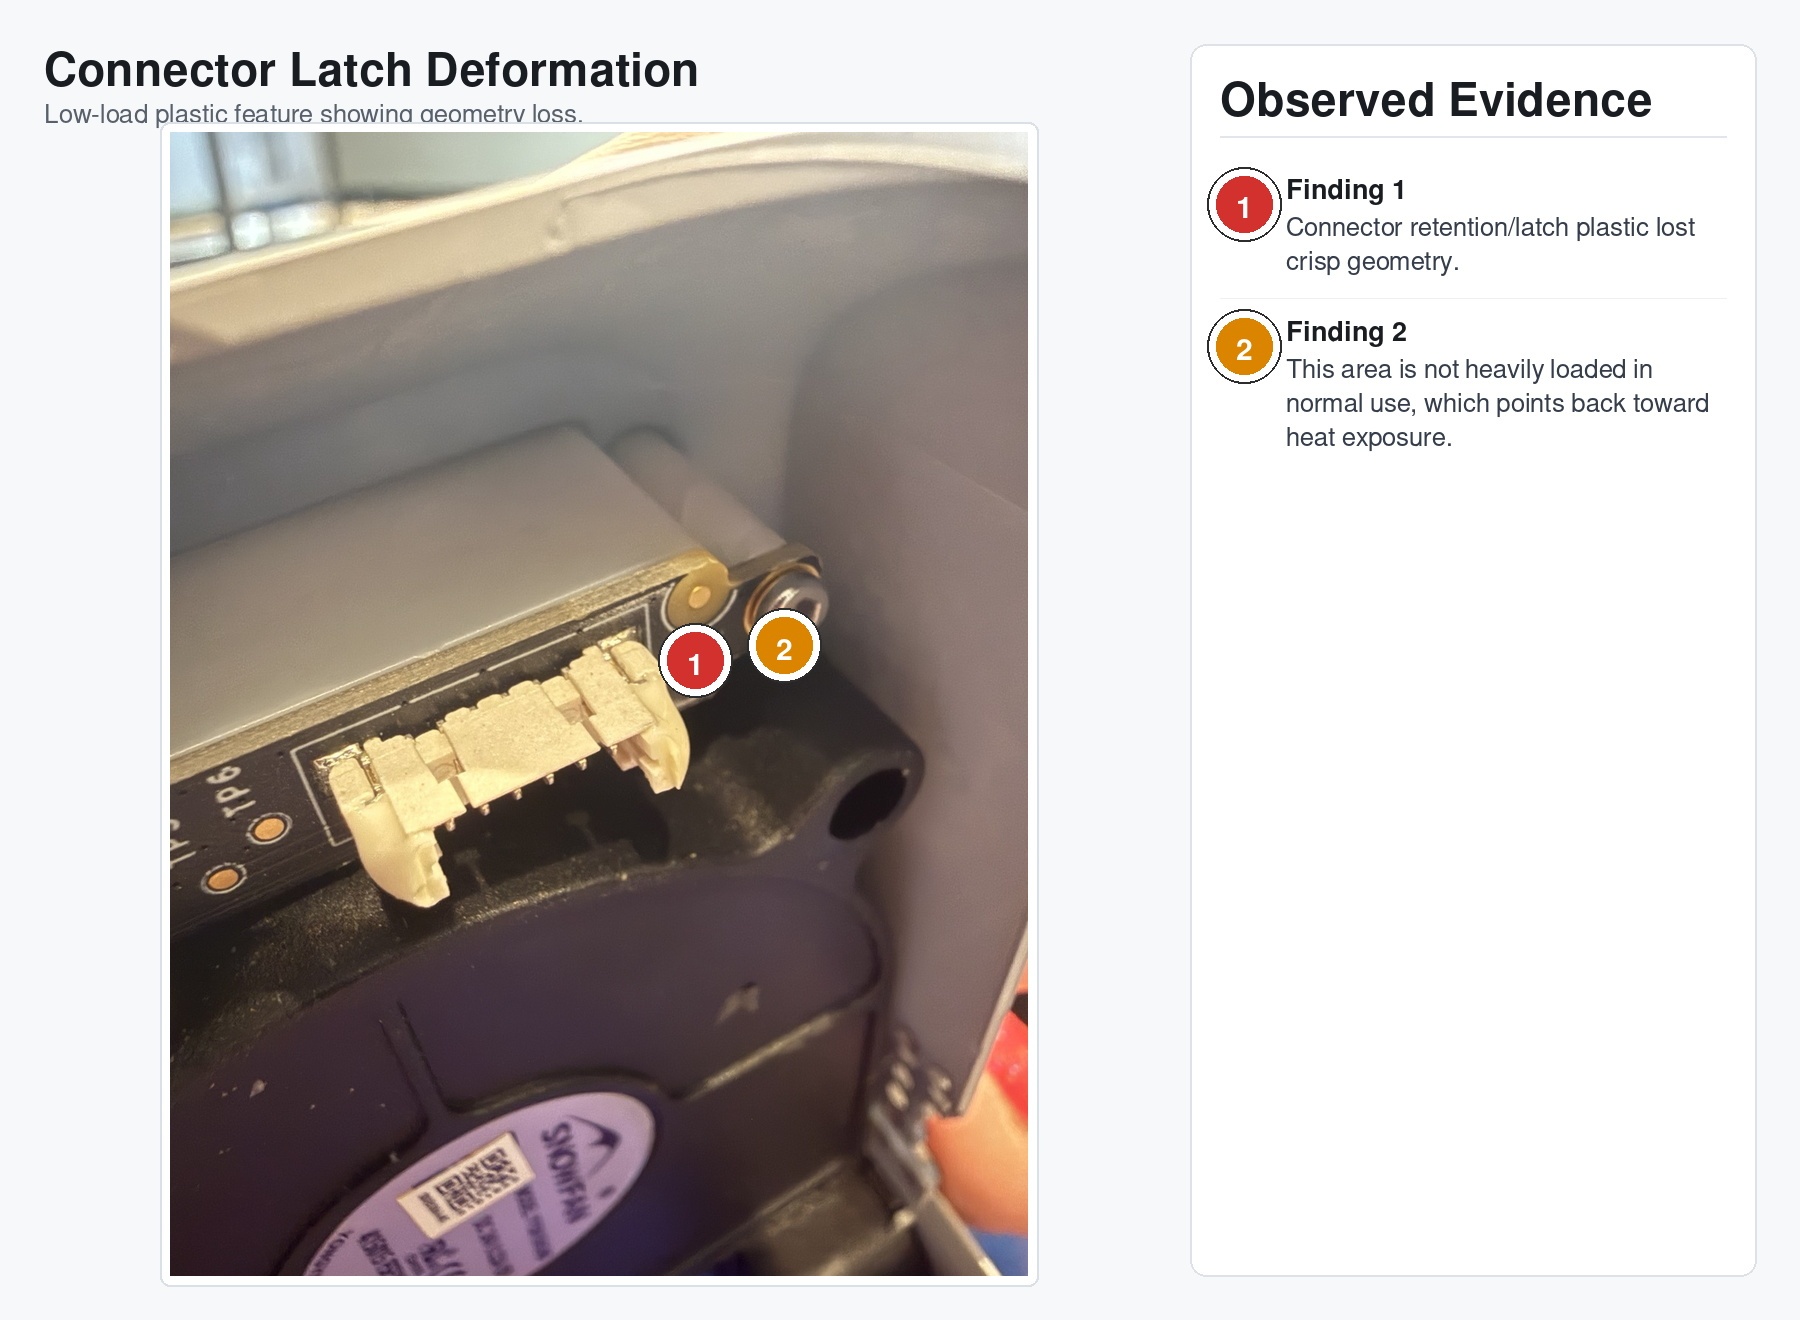
That region is not taking the same kind of repeated mechanical abuse as the cover clips or fan mount. When plastic geometry there starts looking softened, deformed, or less crisp, I pay attention. It points away from one unlucky impact and toward an environmental condition.
The closeups of the cover tell the same story from the mechanical side.

Heat-aged plastic does not need much help. Normal vibration, cutter impulse, and installation stress can finish the job. Once one feature cracks, the remaining features take more load, and the whole assembly starts acting haunted.
It was not haunted.
It was just cooked.
Probable Cause, But Make It Less Boring
If I were writing this as a formal incident report, the probable cause would be something like:
Accelerated thermal aging of printer plastic components resulting from prolonged operation within a secondary enclosure that reduced heat dissipation and increased ambient operating temperatures surrounding the printer.
That is accurate.
The less boring version is:
I put an already enclosed printer inside another enclosure, did not measure the real print-time temperatures, and slowly pushed several plastic parts into a worse life.
Contributing factors:
- The printer already had about eighteen months of service on it.
- The cabinet reduced free air volume around the machine.
- The AMS and top glass area created a thermal stack above the printer.
- PLA printing with the door open helped, but did not fully undo the cabinet effect.
- Normal vibration and cutter actuation finished off parts that heat had already weakened.
- I was watching humidity more closely than temperature, which was the wrong variable for this failure.
The important thing is what did not happen.
There was no evidence of thermal runaway. No fire. No heater control malfunction. No dramatic single event. This was not a catastrophic overheating incident.
It was quieter than that.
It was the kind of failure that accumulates while the machine mostly keeps working.
What I Fixed Immediately
The first fix was replacing the damaged PTFE tube. That one was not optional. A split, heat-deformed filament guide is just asking for feed problems, AMS weirdness, and future misery.
The fan mount got a temporary stabilization repair with cyanoacrylate. I do not consider that a permanent fix. It is a “keep the assembly from getting worse while I get proper replacement parts” fix.
The toolhead cover got clear tape as temporary retention.
Yes, tape.
No, I am not proud.
Also yes, it worked well enough for diagnostic printing.
I also printed and installed a top-glass lift to increase passive airflow around the lid area and reduce heat accumulation near the PTFE routing path. That is another mitigation, not a complete solution.
What I Am Changing Next
The next step is active airflow inside the cabinet. Not just exhaust in the abstract, but actual circulation to reduce stagnant hot air above and around the printer.
I also need temperature logging during real print jobs. Not idle temperature. Not “I glanced at the display and it seemed fine.” Real data over time, ideally with sensors in a few locations:
- Cabinet ambient.
- Above the printer near the AMS/top glass.
- Inside or near the printer chamber.
- Exhaust path.
The long-term fix is replacing the damaged toolhead cover assembly and any compromised plastic hardware. Once plastic retention features have cracked or deformed, I do not trust them just because they are behaving today.
Today is not a design requirement.
Lessons Learned
The obvious lesson is that enclosure-in-enclosure setups need thermal management.
The more useful lesson is that average temperature matters. Peak temperature is easy to think about because alarms and datasheets train us to think that way. But long-duration elevated average temperature can age parts, weaken clips, deform tubing, and turn a previously reliable machine into a slow-motion failure analysis exercise.
I built the cabinet because I wanted the printer setup to be cleaner and more controlled.
It was more controlled.
Just not in the direction I meant.
The machine gave me a pretty good reminder: if you change the environment, you changed the system. Measure the new system, not the one you remember having.
And if your printer starts throwing its own faceplate across the build chamber, maybe listen the first time.